Friday, December 18, 2009

Mud becomes rock


The last week hasn't been one to write home about. The earthen walls behind the new concrete walls continued to deteriorate. My task was to excavate around the form-a-drains and shovel in crushed stone along their outsides so no soil was in contact with them and crushed stone could be dumped on top of them. This would provide a clear path through the crushed stone through which water could drain keeping it off of the concrete walls.

By early this week I had dug along the wall footings and replaced soil with stone, a length of 116 feet, except for about 15 feet at the west end of the master bedroom wall where it meets the bathroom wall.

In that area the soil was so wet it just oozed from the wall toward the footing at about the consistency of cake mix. As fast as I could muck it out it replaced itself. Worse, there was no practical place to toss what I was able to pick up. It had to be carried in buckets all the way around to the east wall, or west to at least the laundry room wall. Dropping it against the earth wall near where it came from just caused it to fill in faster.

The space was barely large enough to walk through. No mechanical equipment could get to it because the wall sections are each too short to reach into with a backhoe or other large shovel.

I spent the better part of two days trying to deal with it. It was a nasty job and I'm glad it's finally over.

Freezing weather actually helped by slowing down the water flow and freezing the mud. Also, all day Wednesday, Sandy cleaned out the trenches on both sides of the lower frost footings while I lined them all with polystyrene.

Here's what the wall "canyons" looked like looking west after sunset Wednesday evening. Visible along the wall is a "clean" section of the polystyrene-covered footing. Just past that, beyond where the shovel is standing, is where the mud slurry begins. It's eerie, isn't it, seeing the tree roots hinging along the edge?


My contractor guru, Dick Stumpner, suggested we just abandon the form-a-drain and install another drain on top of the footing against the walls. This new drain is wrapped in a sleeve to exclude soil which might eventually filter through the stone and clog it.

This approach still required the footings to be cleared, but only down to the footing tops and only a bit wider than the new drain, 6 inches or so. More was better, but in a few areas, considering the muddy soil, the drain width was the best we could do.

Much of the wall length had already been cleared by Thursday morning when the excavating team arrived and we started unrolling drain pipe almost at once. Stone was delivered and they began to dump the crushed stone over the walls onto the pipe. We covered it a foot or two deep to hold it down as we progressed around the wall, digging out a bit of soil here and there to allow the pipe to lay flat on top of the footing.

By the end of Thursday we had all the drain pipe in, from both ends of the wall, to within about 20 feet of each other. Today we worked for about two hours to clear the last 20 feet.

We were able to get a backhoe above the northeast corner of the walls and use it to scrape out most of the north section behind the master bedroom wall. Then stone was dumped over that section so we'd have a place to pile muck from the problem area. Not too long after that the two drain sections were connected.

We spent the rest of the day dumping stone over various wall sections and spreading it into the corners that the backhoe bucket couldn't get close to. Here's what it looks like now.


Weather permitting, we'll pick it up again on Monday morning.

Monday, December 7, 2009

Clearing the footing drains


About the time the concrete walls were finished some of the earthen wall behind them caved in. At some places the fallen material covered the new footings and the outside drain form with heavy clay. To be sure this does not inhibit water behind the wall from draining away, I have been shoveling a trench at least 8 inches wide next to the drains and down far enough to expose the slits in them that allow water in. Then I'm filling the trench with gravel to be sure there will be a path for water when the backfill is added or in case more caves in before the fill is added.


We had snow on the ground this morning so I did some things in the apartment all day. There's a good chance of rain in the morning and for the next few days, up to a half inch or more.

I hope to get the rest of the clay and mud off the drains despite that because it's forecast to be as cold as 12 degrees before the weekend. I might have to lay some of the polystyrene panels over top of the canyon if I have to dig while it's raining. The temperature is forecast to be in the low 40's, not bad for this time of year.

Malcolm Wells, Pioneer of Underground Housing, 1926-2009


Sometime in the last ten years I learned about Malcolm Wells. Soon after I got ahold of one of his books. It is full of good sense and humor.

With no offense intended to friends and relatives, here's just a small fragment of his philosophy of building:

"We live in an era of glitzy buildings and trophy houses: big, ugly, show-off monsters that stand--or I should say stomp--on land stripped bare by the construction work and replanted with toxic green lawns. If the buildings could talk they would be speechless with embarrassment..."

Mr Wells died on November 27th at age 83. I wish I could have met him and I encourage you to visit his web site. You will not be disappointed. It is full of his ideas and sketches of various underground buildings. The web site was created and maintained by his fans since he never really seemed to grasp the internet.

After seeing the damage that our new house is doing to the hillside, I feel like a hypocrite when I recommend his works. I hope we can restore the landscape as closely as possible to what it was and end up with a home that allows nature to reclaim most of the surface it covers.

Maybe not too much work today


This picture through the warm apartment window speaks for itself.

2 days old and already sinking


Or maybe the camera is just tilted.

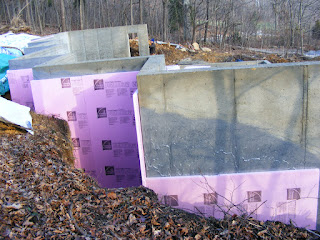
Now that the walls are done it's time to insulate them. I'm using 2 layers of 2-inch extruded polystyrene on the walls and one layer on the tops of the footings. Two layers will provide an R-20 insulating value.

You can see some of the insulation already placed in this picture.


The strange figure in the window below is working on clearing the form drains.


Could he be the Travelocity gnome?

Friday, December 4, 2009

Concrete - Video


Enough of the still pictures. Here's a scan of the finished footings and walls.


When the concrete floor is poured it will be level with the top of the short wall in front. Most of that wall will be underground with the top just an inch or so above the patio level

Concrete - Day 4


It was a short day. The crew came early, knocked out all the connectors, took down all the forms, lifted all the cages of forms back onto the truck, cleaned up and took off. I barely had time to take any pictures.

Here the outside forms have already been removed and lifted over the wall. The walkways at the top of the inside forms have been removed and some of the cages have already been reloaded to the truck.


They left two guys behind to spray the outside of all the walls and footings. One is handling the hose at the top of the wall while the visible one is spraying below. Some of the waterproofing is visible on the wall section to the right.


I took off to buy the first load of insulation panels which will go up two thick - 4 inches, giving us R-20 insulation on the outside of the concrete walls. They were gone by the time I got back.

Thursday, December 3, 2009

Concrete - Day 3


Our third day of the concrete work was much nicer than anyone had expected. It rained 7/10ths of an inch overnight which turned our polystyrene-lined frost footings into miniature canals. But, as the day went on, the temperature rose and, except for the mud mostly outside the building's footprint, it was a pleasant working environment.


The crew knocked out some of the polystyrene that protruded above the footing and dug a small trench at each end of the south wall.

The trench on the east side directed the muddy water into the low area between the dirt pile and the original slope of the hill. This ran down and into the drain I had laid last week under the path below. The drain worked great and the ponds were filling up.


You can see why I need to raise the height of the upper pond's overflow pipe. The water level could be much higher without jeopardizing the pond.

The crew set right to work setting forms on both sides of the rebar that had been placed and tied the day before. While they were doing that the rest of the wall sections' reenforcement was cut, bent and tied into the bars embedded in the footings.


The forms were going up quickly, though some corners on the outside had become tighter to work in than the day before. The chunk of soil and rock seen here is the largest to have broken off along the back wall, but there were lots of other smaller pieces and some parts of the walls were dripping with runoff from above.


The forms they used have a brick pattern. We will be covering most if not all of the interior wall, so the brick facade will be unseen when the house is finished, but it will look interesting in the mean time.

By this time the concrete pump arrived. What an enormous machine! By the time they got it into place and ready to go, there was hardly any driveway left. Huge ruts were created and a few more trees bit the dust.


By then the walls had been braced, a working ledge had been installed along the top ...


and the window block-outs were in place, so they were ready to start pumping.


The boom on the pump had four large segments. When it is deployed it looks somewhat like a gigantic grasshopper.


As the pump's outlet moved along the wall, John followed along with a long concrete vibrator that reached to near the bottom of the forms to encourage the concrete to fill all the nooks and corners of the forms.


The forms for the stem wall are shorter, of course, so they go together more quickly, and they require very little rebar compared with the 9-foot walls. Sitting on the footing is a section of plastic pipe that was embedded in the wall for the drain to the septic system. Tubes were also placed for incoming water, electricity and telephone. These were covered with duct tape to be knocked out when the forms come off.


Here's a view from the hillside above. Progress continues on the pumping, even as work is still going on on the frost footing wall around the greenhouse.


The crew was very efficient and little time was wasted. It seemed everyone was adept at every job so there was never any waiting for the "right" person to get something done. If anyone needed help, the next person along could be drafted for any task.

Wednesday, December 2, 2009

Concrete - Day 2


The weather is turning nasty later today. It was cool at 8 am, but not as cold as yesterday started.

The crew arrived with an enormous truck loaded with heavy forms for the concrete walls. The truck is very long. Amazingly, they were able to back it in almost all the way. As it was being backed up the last 30 feet toward the east wall, the slope was too steep and one axle was literally lifted off the gravel, so it had to stop there.

It's huge outriggers, visible in the picture below, were deployed and the truck was leveled side to side.

The forms are stored in large cages each of which weigh about a ton. The truck has a large crane/boom on the back. It can lift the cages up to 70 feet high and about that far away from the truck. As it was unfurled it reminded me of a kid's transformer toy.


It was so dark the camera's flash went off making the machine look like it's all lit up as light reflected from the ladder sides.

As the operator began to unload cages of forms, the rain started slowly. The guys finished marking the footings in preparation for setting up the forms and, as that effort was being finished, decided to call it a day.

They left the truck in place so they can get a running start after the weather improves. The forecast highs and lows from today through Sunday are 43°/32°, 40°/23°, 34°/20°, 38°/22°, and 41°/27°. Rain and snow are both in the forecast, so it's up to the concrete crew to decide when to finish up.

Tuesday, December 1, 2009

What a difference a day makes


The concrete crew, A & D Construction from south of Odon, Indiana, came at sunrise and left at moonrise and a beautiful full moon it was.

All of our footings were formed and poured in one long day. First, the above-grade forms/drains were placed. This part of the site was under about three inches of water because very thick chunks of hard clay had come out during excavation leaving more depth than desired. Crushed stone had to be placed on both sides of all the above-grade footings. The footing depth here was to be 10 inches so the forms were three inches above the established grade. This left one inch for a layer of extruded polystyrene.


As the forms were finished, extruded polystyrene sheets were placed on the bottom and both sides of the formed space and reinforcing bars (rebar) were placed and tied together on metal lifts called chairs.


By this time the first concrete truck had arrived and they started pouring concrete. I found this situation almost comical as they were pouring concrete on one end of a wall section even before the rebar was all placed and tied at the other end. This picture shows concrete oozing toward one of the guys as he was racing to get the bars tied to the chair.

Twisting wires around the bars is a time-consuming operation, but he was using a tool, visible in his left hand, that grabbed two or more bars and wrapped and twisted them together with wire from a spool inside the tool. Just in front of his knees, if you look carefully, you can see one of the chairs that keep the rebar elevated as it is covered with concrete. It looks like two small ladders in a triangle, like a few pup tent frames side by side.


Most of the back wall segments are complete in this picture. Five or six guys are working constantly as the concrete is placed, plus the truck driver.


Up to this point the concrete trucks were able to pull all the way into the future living area. This was possible because the last wall along the east of the future kitchen area was not dug until all the other walls were poured. Here the guys are cleaning up the bottom of the footing trench under that wall so the polystyrene will lie flat in the bottom.

The footings are at two levels. Those under walls which will be under ground more than a few feet are formed above ground. These are the ones that have been shown so far. This trench is deeper than the frost line. Footings at this level will have a short wall on them that will bring concrete up to the level of the floor slab.

In the background we have spread multiple billboard tarps that extend about 20 feet up the hill to where a small hill of soil diverts rainwater from farther uphill to the building's sides. Water falling on these tarps, if all goes well, will fall harmlessly behind the footings without mud, clay and rock calving off the walls.


This view shows the greenhouse area. It looks like an island. The below-grade footings do not need forms since the earth does a darn good job of stopping concrete. The "walls" are very wavy because the soil came out in big sticky globs. As long as there is a straight area wide enough for the short walls, the footing is adequate. We also lined the trenches with polystyrene. A laser level sits on its tripod inside the greenhouse area.


Looking from the southwest corner to the northeast corner, a distance of about 72 feet.


Looking west to east. The final concrete truck is coming into view to pour the final 60 feet of sub-grade footing.